

Most wine making guides really over-think the wine making process. They tell you to buy all kinds of equipment and additives that you don’t really need.
This tutorial is about stripping wine making down to the absolute bare minimum. It’s so simple that you can get going with just $5 in equipment, and start a batch of wine in under a minute.
What you DON’T Need to Make Wine
This is a short list of items, most pictured in this $120 wine making kit, that you do not need to buy to make wine.
You DON’T need exotic chemicals like potassium sorbate and sodium metabisulfite and campden tablets and acid blend all the other weird extras home wine makers are adding these days. Do you think the pilgrims who landed at Plymouth rock used this chemical warfare when they made wine?
You DON’T need crazy siphoning equipment and large glass carboys that take up half your garage and make your brewing corner look like a mad scientist’s laboratory. Instead of using all this equipment to make big vats of wine a couple times a year, follow this simple 1 minute wine tutorial 26 times a year. You’ll save way more time and money doing your wine in tiny batches.
You DON’T need expensive cleaners like PBW and StarSan and Iodaphor to make good wine either. A certain degree of cleanliness is important, but soap and water – and maybe a little bleach for tougher jobs – is enough to keep a home brewery clean.
Traditional wine is a living, breathing organism that our species has developed a symbiotic relationship with over millennia. It doesn’t need a chemist – it needs a babysitter.
Bare Bones Wine Equipment
You only need to buy 3 very cheap things to make wine – and 1 of them is optional.

Champagne Yeast – You might ask, “What’s wrong with the yeast floating around in the air, or the yeast I use to make bread?” Answer: Nothing! You can use those yeasts too but your wine will take longer and your alcohol content won’t be nearly as high. Champagne yeast ferments a brew with up to a burly 18% alcohol content.
Airlocks – Lets air out so your brew jug doesn’t literally explode. At the same time it keeps foreign yeasts and bacteria out. There’s 2 popular designs and I use the 1-piece design because it’s cheaper and harder to break.
Hydrometer – this optional piece of equipment measures alcohol content. Without one, you won’t necessarily know if what you just made is 8% booze or 18% booze. If you follow my tutorial exactly, you won’t need one – you’ll get something around 15%.
Total estimated cost for equipment – less than $5.
If you are lucky enough, as I was, to have a home brew supply store near you, get this equipment there. Yeast, plugs and airlocks are all about a dollar each and the hydrometer probably runs about $10.
Otherwise, you will have to pay shipping from amazon, for a total cost of still very cheap. Here are the ones I would get.
- Bubble Airlock with “universal” Bung (2-pack)
- 18% Champagne yeast
- Hydrometer with testing jar – make sure you get one that includes the test tube!
Why to NOT Brew in 5 Gallon Buckets
I used to do all my brewing of wine and beer in 6 gallon carboys and buckets – but it’s just too much work. I’m going to do something I’ve never done before and discourage you from using 5 gallon buckets or carboys to make wine.
5 gallons of liquid is very heavy so you can’t easily pour from one vessel into another, or shake it around to dissolve in some sugar. As soon as you start working with these larger sizes you need buy tubes, siphoning equipment, something called a racking cane, and a special harness to carry full jugs safely. And having all this extra equipment means you have to keep it all clean which becomes an hour-long chore all by itself.
Shoot for around 1 gallon, but the exact size is up to your supermarket – because the key to 1-minute wine is to brew right in the container the juice comes in. This way you know the the juice is completely contaminant free.
This is the juice I bought for around $4 for a 3/4 gallon jug. I calculated a total ingredient cost of about $1.60 for each 750ml amount that the liquor store across the street wants $12.00 for.

These are the 5 simple steps to turn the juice from the supermarket into wine.
- Buy juice
- Add sugar
- Shake shake shake!
- Plug with airlock
- Wait
I’ll give some brief details on each of these steps.
Buy Juice
Any juice will work for wine, I like red grape juice because it will make normal red wine. But get adventurous – find something on sale or in season. Any fruit will work, even berries. The most important number to look at is the sugar content, because this will tell you how much alcohol you’ll get in your finished wine
Watch out, because many of the juices on the store shelves have corn syrup as a first ingredient. Corn syrup will ferment fine, but do you really want to drink corn wine?
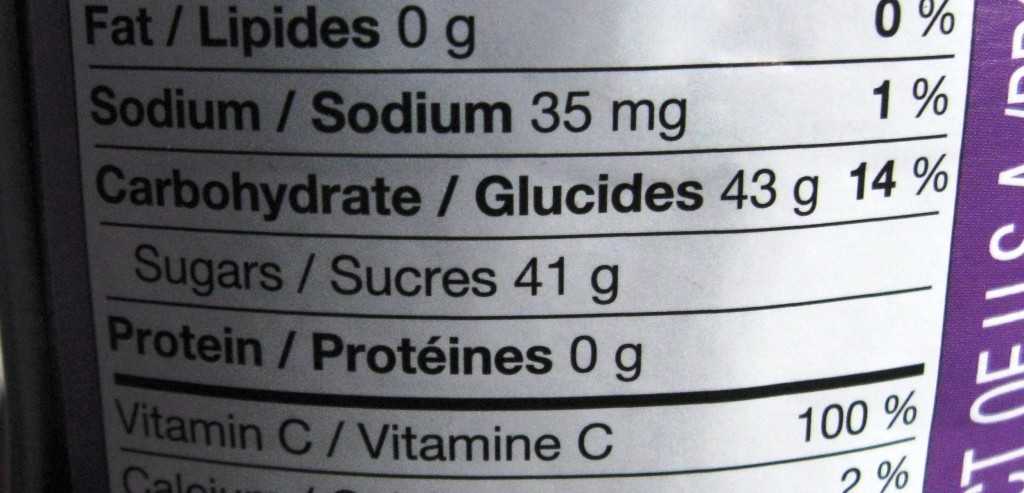
The grape juice I’m using in our example has 41g of sugar per cup – that’s pure grape sugar, no added sugar whatsoever. Ideally we want about double that – but we can make up the difference by adding pure sugar or honey.
How Small can you Go?
I’ve successfully brewed a batch in a 1.89 liter bottle, which is exactly half a gallon.

I suspect you could go even smaller but if you get too small your yeast might not reach the critical mass needed for proper fermentation.
Add Sugar
According to the label, the unsweetened grape juice I’m showing here has 41g of sugar per cup.
I tested the juice with my hydrometer at 8%. That means if I added my yeast right now without any additional sugar, I would get 8% wine. If you choose to use a hydrometer, here’s what to look for.

8% would make a strong beer, but a weak wine. I like to shoot for wine around the typical range, between 13% and 15%.
3 cups of additional sugar brought my 3/4 gallon batch up to 15% potential alcohol. You’ll have to dump out some of the juice first before adding the sugar. I added 3 cups of sugar, so I removed about 3 cups of juice.
Use a clean funnel for adding the sugar, I used a rolled up piece of paper which worked just fine.

This brought my potential alcohol up to 15%. So as a rule of thumb, add about 4 cups sugar for each gallon of grape juice if your grape juice is similar in sugar content to mine and you want a 15% alcohol wine.
Champagne yeast will ferment to about 18% alcohol before the alcohol content will kill all the yeast. So there’s no point going above about 18% potential alcohol.
Shake Shake Shake!
Shaking the container very well helps dissolve the sugar completely so you can get a highly accurate reading of your alcohol percentage. Shaking takes the bulk of the time in this “1-minute wine.”
It’s almost impossible to shake a massive 5 gallon carboy of juice very well, but even a kid can shake a gallon of liquid without breaking a sweat.
After adding 3 cups of sugar and shaking very well, you’re ready to pitch your yeast.
Add Yeast
Your juice is at room temperature right? Yeast does best at between 70 and 90 degrees – the hotter it is the quicker she goes.
You just need a little bit of yeast, about the size of a nickel. No need to use an entire pack, only about 1/5 of the package is more than enough. Save the rest for your next batch in a zip-lock bag in the fridge.

No need to shake the yeast in, it will find its way to where the sugar is, breed like crazy, and turn all the sugar into alcohol.
Plug with Airlock
The airlock lets CO2 out while keeping air-bound yeasts and molds out. Airlocks are dirt cheap, so it makes sense to have more than one so you can get multiple wine batches going at the same time.

The airlock needs to be filled part full with water to work! Fill to just below the “max fill” line.
Some people use vodka instead of water to make sure the airlock liquid stays contaminant free. Not a bad idea if the liquid will stay in your airlock for a long time.
The max speed of bubbles in your airlock for a 3/4 gallon jug – about 5 seconds between bubbles. Once about 50 seconds pass between bubbles this will be ready to cap and store.
Wait
Your vat of highly sweetened grape juice will slowly turn into wine over the course of the next 2 weeks. You’ll know the wine’s done once your airlock stops bubbling. If you have a hydrometer, you can test as you go along, the “potential alcohol” reading will slowly drop, usually all the way to 0%, as the days pass.
To find your final alcohol content, just subtract your initial reading by your final reading. So in my case, 15% – 0% = 15% alcohol.
Storing your Wine
Once your wine has fermented down to 0% or your airlock has stopped bubbling, you can remove the stopper and cap it, using the cap that came with your grape juice. You kept that cap right? I like to keep my cap in a tiny plastic bag around the neck of the bottle – that way I don’t ever lose it. I clean it with hot water and soap before screwing it on.

See all that yeast sediment in the bottom of your finished wine? It’s best not to store your wine too long with all that stuff in there, or it will eventually start tasting like dead yeast – which won’t kill you but doesn’t taste good either. That’s called “Yeast Autolysis”
Just slowly and gently pour your finished wine into a container of the same size , leaving the yeast behind. Discard the spent yeast in the compost pile or something. This stuff is really nutritious.
Your wine will probably taste TERRIBLE right off the bat, that’s normal. It might be to your liking after only 2 weeks, or could take as long as 6 months. The more white sugar you use, the longer it seems to want to age for. In the meantime, buy another jug of juice and begin the process over again. I always have one jug going on the counter between the stove and refrigerator – the warmest part of the house.
Make sure to mark down the dates when the wine was bottled – trust me, you won’t remember otherwise.
Watch your “wine cellar” for bottles that seem to be bulging. This means your yeast is still actively producing carbon dioxide. That’s not a problem, you just need to vent the CO2 off by unscrewing and re-screwing your cap to let the extra gasses out, just like you would with fizzy soda. If this happens, it means you didn’t wait long enough during your brewing stage.
Written by:
Don Pontious, owner and operator of SHTFseries.com Blog & RadioKAOS.live