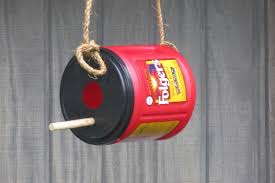

This Do It Yourself or DIY birdhouse design is a simple and fun way to attract your favorite small birds to your backyard. This project is particularly cool because it be can built almost entirely with recycled materials and scrap wood! If you don’t have the materials around you or in your area, they can be bought for cheap at your local hardware store. I would like to encourage everyone to use a recycled can or similar container. You can find scrap wood from old pallets or from local construction sites, there are some great tips on this website here. Go out and find some recycled materials and get started right away!
MATERIALS:
-Two scraps of 3/4-inch-thick pine board, measuring at least 4-1/2 inches. square
-Two 1/4-inch-thick plywood or paneling scraps, measuring at least 6 inches x 9 inches each
-1/4-inch dowel, 8-1/2 inches long
-1-1/4-inch finishing nails
-One 11-ounce coffee can
-Hooks, wire or a chain for hanging the birdhouse
-Table saw
-Power drill
6 easy steps!!
STEP 1
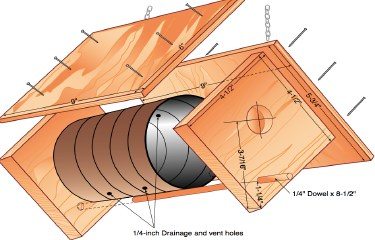
Cut the ends of the birdhouse 4-1/2 inches, square from scrap pine boards. Locate the entrance hole in one board by measuring 3-7/16 inches from one corner. (When measuring, place your ruler diagonally from corner to corner and draw a light pencil line.) Be sure to mark the corner from which you’re measuring—you’ll need to measure from it again in Step 4. Drill a 1-inch entrance hole for wrens or the appropriate-size hole for other small birds you’d like to attract.
STEP 2
Hold the front and back pieces together in a vise or clamp them together. Locate the perch by measuring 1-1/4 inches from the same corner used in step 2 and mark this spot on the pencil line. Then drill a 1/4-inch hole through the front piece (with the entrance hole) and most of the way through the back.
 Buy the birdhouse book on Amazon!
STEP 3
Cut the roof pieces from 1/4-inch plywood or paneling scraps. Cut one piece to measure 5-3/4 inches x 9 inches, and the other 6 inches x 9 inches. Nail the roof pieces to the front and back boards with 1-1/4-inch finishing nails. The large roof piece should overlap the smaller at the peak. (If you’re using paneling, the back side should face out.) Leave enough room between the front and back pieces so you can easily insert the coffee can.
STEP 4
Clean and dry the coffee can (watch out for sharp edges). Drill two 1/4-inch holes in one side of the can for drainage. Drill two more 1/4-inch holes on the opposite side of the can for ventilation.
STEP 5
Place the coffee can between the front and back boards. Cut a 1/4-inch dowel to 8-1/2 inches long and insert it through the perch holes. If the fit is too snug, lightly sand the dowel, which holds the can in place.
 Buy the birdhouse book on Amazon!
STEP 6
Attach a chain, hooks or wire for hanging the birdhouse. Find a good spot in yard to bird watch, as your new tenants come and check out all of your hard work!
There you have it, a new home for your bird friends, in just six simple steps. As always, work with what you have available around you. Have fun by getting creative and making this project your own. Take the time to decorate the house however you like. You can also substitute the metal can for a plastic one with a few adjustments, or you can change up the design of the roof, I’ve never heard the birds complain!